How to Declutter and Label Smart Home Devices for Cognitive Impairment: A Step-by-Step Guide for Caregivers and Families
Introduction
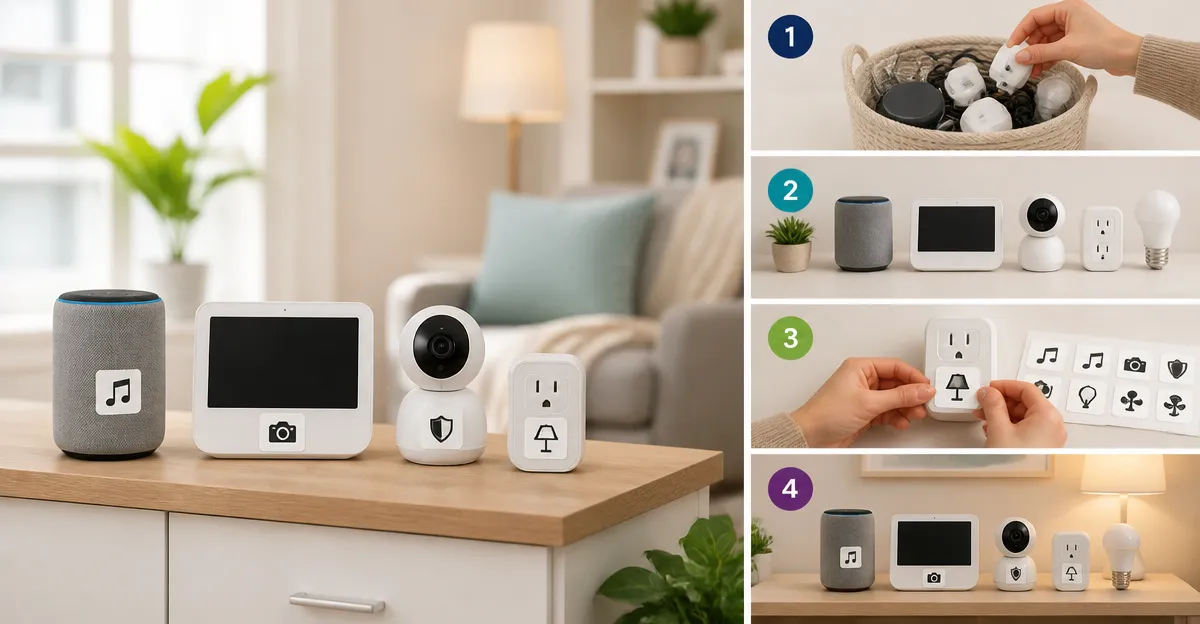
Caregivers often encounter environments where smart home devices are scattered, unlabeled, and difficult for individuals with cognitive impairment to operate safely. This guide explains how to assess, organize, and label such devices so that users can identify functions quickly and avoid confusion. Readers will learn a systematic approach that reduces anxiety, enhances independence, and promotes a calmer household atmosphere. The methods described are practical, cost‑effective, and can be implemented with minimal technical expertise.
What You'll Need
- Label makers: Brother P‑Touch PT‑N10, Brother P‑Touch PTD210, Brother P‑Touch PTD220, DYMO LabelManager 160, Brother P‑Touch PT‑N20
- Color‑coded label tapes compatible with the chosen maker (Btag tapes for Brother, D1 tapes for DYMO)
- Basic cleaning supplies (microfiber cloth, mild cleaner) to prepare device surfaces
- Notebook or digital spreadsheet for inventory tracking
- Battery pack or AC adapter for devices that require power
Step 1: Assess the Environment
Begin by walking through each room and noting the location of every smart device, including voice assistants, smart plugs, thermostats, and security cameras. Record the device name, function, and current placement in a notebook or spreadsheet. This inventory creates a visual map that highlights redundant devices, misplaced items, and high‑traffic zones where labeling is most critical. Caregivers should involve the person with cognitive impairment during this walk‑through to gauge their awareness and gather feedback.
Step 2: Consolidate and Relocate Devices
After the inventory, determine which devices are essential and which can be removed or consolidated. For example, multiple smart plugs controlling the same lamp can be merged into a single, centrally located plug. Relocate devices to logical positions—such as placing a voice assistant near the main seating area or moving a smart thermostat control to a reachable wall height. Consolidation reduces visual clutter and simplifies the labeling process.
Step 3: Design a Consistent Labeling System
Choose a color‑coding scheme that aligns with the user's preferences. For instance, use blue labels for lighting controls, green for climate devices, and red for security equipment. Consistency in font size and style enhances readability; a 12‑character display screen is sufficient for most short descriptors. Draft sample label texts such as "Living‑Room Light", "Thermostat Up", or "Front Door Cam" before printing. This planning stage ensures that each label conveys clear, actionable information.
Step 4: Print and Apply Labels
At this stage, select a label maker that matches the chosen tape format and desired portability. The Brother P‑Touch PT‑N10 is an excellent handheld option for quick, on‑the‑spot labeling. Priced at $19.99 with a 4.3‑star rating, it uses 6 AAA batteries and prints up to two lines of text on ½‑inch Btag tapes available in 17 colors. Its full QWERTY keyboard and preview screen reduce errors, and the built‑in cutter produces clean edges, making it ideal for labeling devices in hard‑to‑reach locations.
For larger projects or when multiple label styles are required, the Brother P‑Touch PTD210 offers a more robust solution at $69.99 with a 4.6‑star rating. It supports 12 mm, 9 mm, 6 mm, and 3.5 mm tape widths, allowing caregivers to choose narrower tapes for compact switches or wider tapes for prominent devices. The PTD210 includes a protective case and optional AC adapter, ensuring uninterrupted labeling sessions during extensive reorganizations.
When a desktop‑oriented workflow is preferred, the Brother P‑Touch PTD220 provides a balanced blend of portability and feature depth at $44.99 with a 4.5‑star rating. It stores up to 30 frequently used label layouts, which saves time when labeling similar devices across multiple rooms. Its 15‑character display screen offers a clear preview, and the device prints on durable TZe laminated tapes that resist water and fading—crucial for kitchen appliances and bathroom fixtures.
For caregivers who prefer a computer‑style keyboard, the DYMO LabelManager 160 delivers a familiar typing experience. At $54.99 and a 4.4‑star rating, it prints on D1 tapes (½‑inch width) and includes three starter cassettes. Its auto power‑off function conserves battery life, and the device’s compact form factor makes it easy to carry between rooms. The DYMO is particularly useful when labeling bulk items such as cable bundles or storage bins.
Finally, the Brother P‑Touch PT‑N20 combines desktop stability with handheld convenience at $29.99 and a 4.3‑star rating. It prints up to two lines of text with a combined height of 9 mm, providing slightly larger characters than the PT‑N10. The PT‑N20’s 16‑character preview screen and built‑in cutter make it suitable for labeling larger devices such as smart hubs or wall‑mounted panels.
When applying labels, clean each surface with a microfiber cloth to remove dust and oils. Peel the backing carefully, align the label with the device, and press firmly for a few seconds. For devices that experience frequent contact, choose laminated or waterproof tapes (available for Brother and DYMO) to ensure longevity.
Step 5: Verify Functionality and Adjust
After labels are affixed, test each device with the intended user. Observe whether the individual can locate the label, read the text, and operate the device without hesitation. If a label is difficult to read, consider increasing font size, using a contrasting color, or adding a simple symbol (e.g., a sun icon for lighting). Adjust the labeling system iteratively until the user demonstrates confidence and reduced reliance on caregiver prompts.
Tips & Pro Tips
- Use high‑contrast color combinations (e.g., white text on dark tape) to aid visual perception.
- Reserve a single color for emergency devices such as smoke detectors to prevent accidental mislabeling.
- Store spare label tapes in a clearly labeled drawer so that replacements are readily available.
- Document the final labeling scheme in a printed guide that can be placed near the main control hub.
- Consider using QR codes printed on larger labels for tech‑savvy users; scanning the code can launch a tutorial video.
Troubleshooting
- Labels do not adhere properly: Ensure the surface is clean and dry; use a small amount of adhesive spray for glossy surfaces.
- Text is truncated on the label: Reduce the number of characters or select a narrower tape width; the PTD210 supports 3.5 mm tapes for tight spaces.
- Battery life is short: Replace AAA batteries with high‑capacity alkaline cells or use the optional AC adapter for continuous operation.
- Label printer jams: Verify that the tape is correctly loaded and that the cutter blade is clean; the DYMO LabelManager 160 includes a jam‑release lever.
Conclusion
By following this structured approach, caregivers can transform a chaotic smart‑home environment into an organized, user‑friendly space that supports individuals with cognitive impairment. The combination of careful assessment, consistent color‑coding, and reliable label‑making tools such as the Brother and DYMO devices ensures lasting clarity and safety. Implementing these steps not only reduces daily frustration but also fosters greater independence for the person receiving care.
Products Mentioned in This Guide
Frequently Asked Questions
Why is decluttering smart home devices important for people with cognitive impairment?
A tidy, clearly labeled environment reduces confusion, lowers anxiety, and helps users operate devices safely and independently.
What basic tools are needed to label smart home devices?
A label maker (e.g., Brother P‑Touch models), adhesive labels, a marker, and a simple inventory list are sufficient.
How should I prioritize which devices to label first?
Start with high‑risk or frequently used devices such as smart locks, thermostats, and voice assistants, then move to less critical items.
What labeling format works best for cognitive impairment?
Use large, high‑contrast text with simple icons or color‑coded symbols that convey the device’s function at a glance.
Can I label devices without technical expertise?
Yes—most label makers are plug‑and‑play, and you can follow a step‑by‑step checklist to label each device without needing advanced tech skills.