How to Calculate Grab Bar Installation Cost for Seniors: DIY vs Pro Price Guide
Introduction
Ensuring safe bathroom access for seniors often begins with installing grab bars that meet ADA standards. This guide explains how to estimate the total cost of a grab‑bar project, whether you choose a do‑it‑yourself approach or hire a professional contractor. Readers will learn to itemize materials, factor labor rates, and understand hidden expenses such as wall preparation and permits. By the end, one will be able to make an informed financial decision that balances safety, compliance, and budget.
What You’ll Need
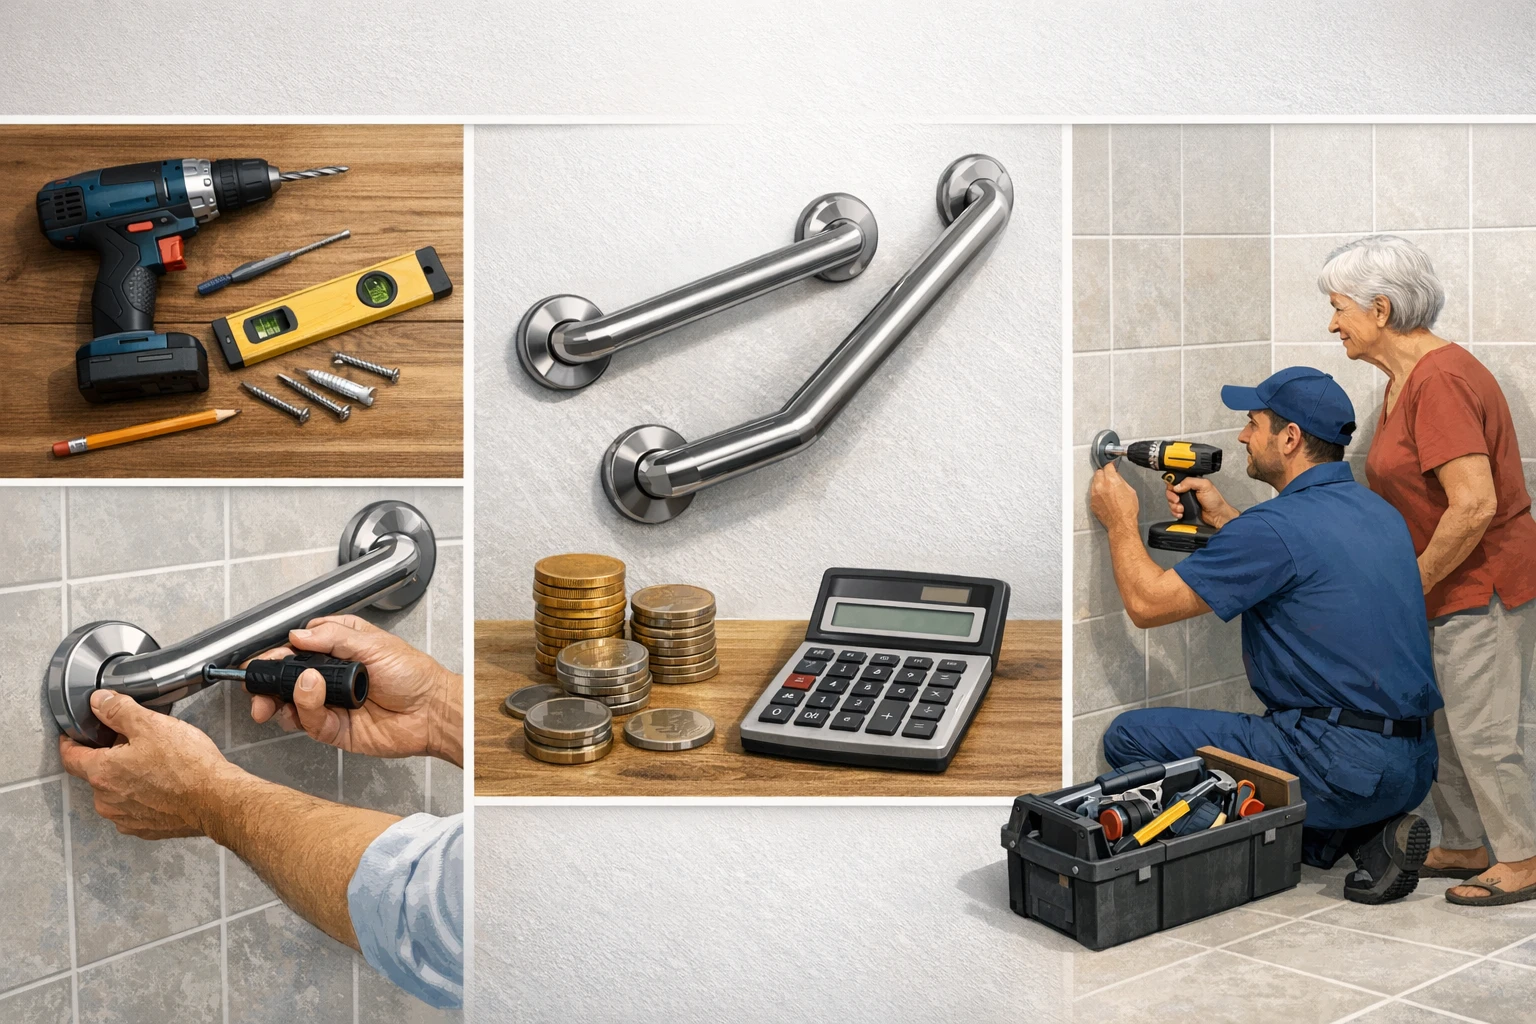
- Measuring tape, level, and stud finder
- Drill with appropriate bits
- Screws, anchors, and wall plugs (often included with the grab bar kits)
- Safety goggles and gloves
- Optional: Silicone sealant for wet‑area applications
- Recommended products (see steps for details)
Step 1: Assess the Installation Site
The first task is to evaluate the wall type, stud spacing, and moisture exposure in the intended location. Use a stud finder to locate vertical studs; a 16‑inch on‑center pattern is typical in residential construction. If the wall is tiled, verify that the tile is securely bonded and that you have access to the underlying studs. This assessment determines whether a wall‑mounted system or a suction‑based solution is appropriate.
For tiled walls where drilling is feasible, a wall‑mounted system such as the GrabBars.com ADA Grab Bar Bundle offers the most reliable compliance. The bundle includes three stainless‑steel bars (18", 36", 42") with a 1.5" diameter and a 500‑lb weight capacity, making it suitable for commercial‑grade installations. Its 12‑hole flange accommodates various stud spacings and tile patterns, reducing the need for custom drilling.
If the wall surface is smooth, non‑porous, and you prefer a non‑invasive solution, the TAILI Suction Shower Grab Bars provide a removable alternative. These bars rely on upgraded rubber suction cups that can hold up to 330 lb on airtight tiles, eliminating the need for drills or anchors.
Document the measurements, note any obstacles (e.g., plumbing, electrical boxes), and photograph the area for reference when obtaining quotes from professionals.
Step 2: Choose the Appropriate Grab Bar System
When selecting a system, consider three factors: compliance, load capacity, and installation method. The GrabBars.com ADA Grab Bar Bundle is fully ADA‑compliant, with a 1.5" standoff distance that meets the 1.5‑inch clearance requirement for wheelchair access. Its stainless‑steel construction resists corrosion in wet environments, making it ideal for showers and tub edges.
For a budget‑friendly, single‑length solution, the Amazon Basics Safety Grab Bar offers an 18‑inch bar at $25.82, also rated 4.8/5 with over 9,000 reviews. Though it lacks the multiple lengths of the GrabBars.com bundle, it provides the same 500‑lb capacity and ADA compliance for smaller spaces.
If anti‑slip comfort is a priority, the Tesuchan Anti‑Slip Grab Bars incorporate silicone grips that conform to five fingers, enhancing grip even when wet. Each 16‑inch bar costs $18.99 and includes extra‑long screws for a secure mount.
Match the product to the site assessment: wall‑mounted for permanent, high‑traffic areas; suction for temporary or rental situations; single‑length for limited space; anti‑slip for users with reduced hand strength.
Step 3: Calculate Material Costs
Begin by listing each component and its price. For a full ADA‑compliant bathroom, the GrabBars.com bundle (three bars) costs $85.95 and includes all necessary stainless‑steel screws and wall anchors. Add $5–$10 for a drill bit set if not already owned. If you need additional anchors for unusual stud spacing, budget $0.50 per anchor (average 8 anchors = $4).
Using the Amazon Basics bar, the material cost is $25.82 for a single 18‑inch bar plus $5 for a basic drill set, totaling $30.82. This option is economical but may require purchasing multiple bars to achieve the same coverage as the bundle.
The Tesuchan set provides two 16‑inch bars for $18.99, and includes mounting hardware, so the material cost remains under $20. However, you may need extra screws if the wall is tiled, adding $3‑$5.
For suction‑based installation, the TAILI set is $69.99 for two bars. No drilling tools are needed, but you may wish to purchase a small utility knife to trim suction cup edges, costing $2.
Step 4: Estimate Labor Costs (Professional Installation)
Professional plumbers or handymen typically charge $50–$100 per hour, plus material markup of 10‑15 %. A standard installation of a wall‑mounted grab bar takes 1.5 hours, resulting in labor costs of $75–$150. Adding the 12‑% markup on materials ($85.95 × 1.12 ≈ $96.26) yields a total professional estimate of roughly $171–$246.
For a single Amazon Basics bar, labor remains similar (1 hour) because the mounting process does not change. The total professional cost would be $50–$100 labor plus $25.82 × 1.12 ≈ $28.92 material, resulting in $78.92–$128.92.
Installing suction bars generally does not require a professional; however, if a homeowner prefers verification of load capacity, a handyman may charge a flat $40‑$60 for a quick assessment.
When requesting quotes, ask contractors whether they include wall preparation (e.g., tile removal) and whether permits are required in your jurisdiction. These hidden costs can add $20‑$50 per job.
Step 5: Add Permit and Inspection Fees (If Applicable)
Many municipalities require a building permit for modifications that affect accessibility, especially in multi‑unit dwellings. Permit fees range from $30 to $100 depending on the city. After installation, an inspector may verify ADA compliance, charging an additional $50‑$80.
For DIY projects, the homeowner can often self‑certify compliance, but it is advisable to keep documentation (measurements, product specifications) in case of future inspections.
Include these fees in your total budget: for example, $70 permit + $60 inspection = $130 additional cost.
Summarize the total cost for each scenario in a table for clarity.
Step 6: Compare Total Costs
| Option | Materials | Labor | Permits & Inspection | Total Approx. |
|---|---|---|---|---|
| Full ADA Bundle (DIY) | $85.95 + $5 tools = $90.95 | 0 | $0 | $90.95 |
| Full ADA Bundle (Pro) | $96.26 (incl. markup) | $75–$150 | $130 | $301.26–$376.26 |
| Amazon Basics (DIY) | $30.82 | 0 | 0 | $30.82 |
| Amazon Basics (Pro) | $28.92 | $50–$100 | $130 | $208.92–$258.92 |
| Tesuchan (DIY) | $18.99 + $5 extras = $23.99 | 0 | 0 | $23.99 |
| TAILI Suction (DIY) | $69.99 + $2 knife = $71.99 | 0 | 0 | $71.99 |
These figures illustrate that DIY installations can reduce total cost by 60‑80 % compared with hiring a professional, provided the homeowner possesses basic carpentry skills and the wall conditions are favorable.
Tips & Pro Tips
- Always verify stud location before drilling; mounting into a stud provides the highest load capacity.
- When installing on tile, use a carbide‑tipped drill bit to avoid cracking the ceramic.
- Apply a thin bead of silicone sealant around the screw heads in shower areas to prevent water ingress.
- For suction bars, clean the wall surface with isopropyl alcohol and allow it to dry completely before attaching the cups.
- Consider adding a second bar at a 45‑degree angle for users who need extra support when turning.
- Keep the original packaging and hardware in case future removal or replacement is required.
Troubleshooting
Problem: Screws loosen after a few weeks of use.
Solution: Re‑tighten using a torque screwdriver set to 5‑7 Nm; if the wall material is compromised, replace the anchor with a toggle bolt.
Problem: Suction bar loses grip after exposure to steam.
Solution: Wipe the suction cups with a dry cloth after each use and re‑press firmly for 10 seconds. If the problem persists, replace the cups.
Conclusion
Calculating grab‑bar installation costs involves itemizing materials, estimating labor, and accounting for permits. DIY installation using high‑quality products such as the GrabBars.com ADA Grab Bar Bundle or the Tesuchan Anti‑Slip Grab Bars can deliver professional‑grade safety at a fraction of the price. However, for complex wall conditions or when compliance documentation is required, hiring a qualified contractor may be the prudent choice.
By following the steps outlined in this guide, readers can confidently assess their needs, select the appropriate tools, and budget accurately for a safe, accessible bathroom.
Products Mentioned in This Guide
Frequently Asked Questions
What factors determine the total cost of a grab‑bar installation for seniors?
The cost includes the price of the grab bar kit, required hardware, wall preparation (e.g., patching or moisture‑resistant treatment), labor rates if hiring a pro, and any permits or compliance fees.
Is DIY grab‑bar installation cheaper than hiring a professional?
Generally, DIY saves on labor fees and can cost 30‑50% less, but you must factor in your time, tool costs, and the risk of improper installation.
What tools and materials are essential for a safe DIY grab‑bar install?
You’ll need a measuring tape, level, stud finder, drill with bits, screws/anchors (often in the kit), safety goggles, gloves, and optionally silicone sealant for wet‑area use.
Do I need a permit to install grab bars in a bathroom?
Permits are rarely required for simple grab‑bar mounts, but local building codes vary, so check with your municipality to ensure compliance.
How can I ensure my grab‑bar installation meets ADA standards?
Install the bar on a vertical stud, position it 33‑36 inches above the floor, extend at least 42 inches horizontally, and use hardware rated for the required load.