Introduction
This guide explains how a person with low vision can create safe, tactile medication labels using Braille and raised markers. It demonstrates a systematic workflow that reduces medication errors and increases independence. The reader will learn which tools are most reliable, how to prepare each container, and how to maintain the labels over time. The information is valuable because medication misidentification is a leading cause of adverse health events among visually impaired individuals.
What You'll Need
- Handheld Braille Labeler – manual, lightweight, includes a roll of 1/2" vinyl tape.
- Reizen Braille Labeler – compact, ergonomic, comes with a free roll of self‑adhesive tape.
- Braille Labeling Tape – clear, 1/2" wide, twelve‑foot rolls for high‑visibility labeling.
- Bump Dots Combo Pack – silicone tactile stickers in four colors for additional identification.
- Braille Container Labels – pre‑cut, transparent labels that accept four lines of Braille.
- Permanent‑marker pen (non‑toxic), alcohol wipes, a small pair of scissors, and a clean, flat workspace.
Step 1: Organize Your Medication
The first action is to gather every medication that requires labeling. Place each bottle, blister pack, or sachet on a clean surface and verify the expiration date. Group items by therapeutic class (e.g., antihypertensives, analgesics) to simplify later categorization. This organization prevents accidental omission of a product during the labeling process.
Step 2: Choose the Appropriate Label Type
If the container has a smooth, flat surface, the Braille Container Labels provide a durable, see‑through solution that does not obscure printed information. Each label measures 4" by 1.75" and can hold up to four lines of Braille, making it suitable for larger bottles. For smaller containers such as pill blister packs, the Handheld Braille Labeler with its 1/2" vinyl tape is more practical because the tape can be cut to the exact length required.
Step 3: Prepare the Braille Labeling Device
Insert the supplied roll of vinyl tape into the chosen labeler. The Handheld Braille Labeler measures 10" long, 4" wide, and 2" tall; its upper rim is embossed in Braille, which assists blind users in aligning the dial. The Reizen Braille Labeler, at 10" by 4" by 2.38" high, offers a comfortable palm grip and includes a free roll of clear tape. Verify that the tape feeds smoothly by gently pulling a few centimeters; a smooth feed indicates that the device is ready for embossing.
Step 4: Emboss the Medication Information
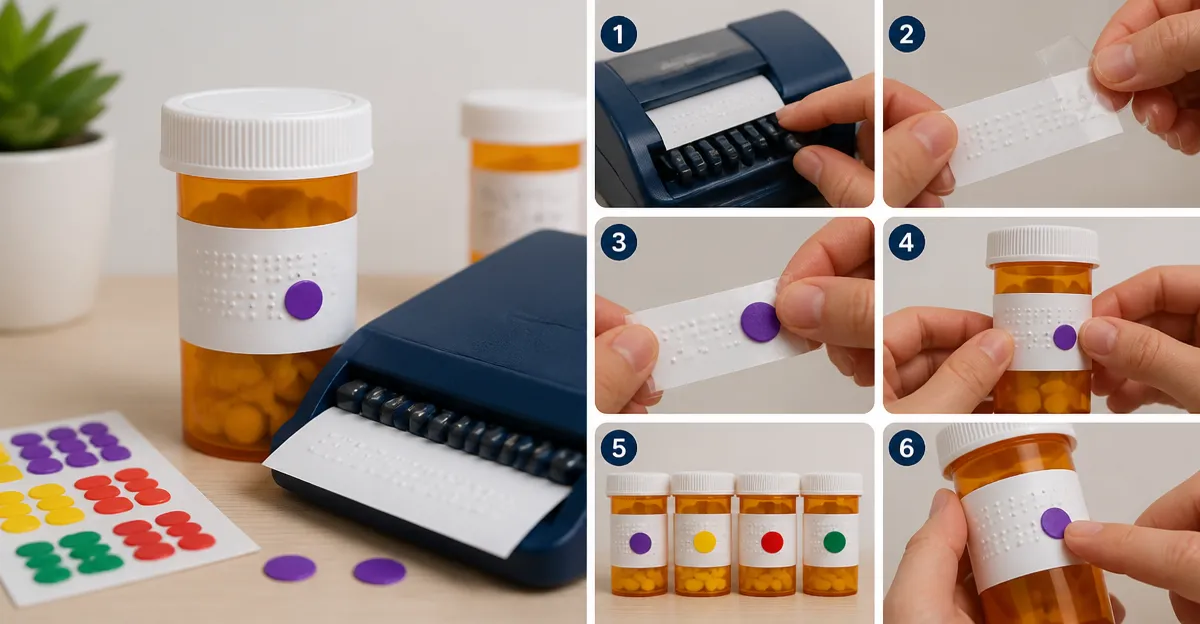
Identify the essential data for each medication: generic name, dosage strength, frequency, and any special instructions (e.g., take with food). Using the dial on the labeler, select each letter or number and squeeze the trigger to emboss the Braille dot. For the Handheld Braille Labeler, a gentle tug with the left hand releases the cut label after each line, allowing the user to peel and stick it immediately. The Reizen Braille Labeler requires a double squeeze for the cut function, which ensures a clean separation of the label from the backing.
When embossing multiple lines, pause after each line to confirm that the correct characters were produced. The Handheld model includes a Braille‑only dial, so sighted assistants may wish to verify the output by feeling the raised dots. The Reizen model’s clear tape permits sighted individuals to read the printed characters underneath the Braille, facilitating cross‑verification.
Step 5: Apply the Labels to the Containers
Peel the backing from the freshly cut label and press it firmly onto the container surface. For bottles with curved sides, apply the label to a flat portion near the base to ensure full contact. If the adhesive does not adhere well to a plastic surface, use a small amount of clear, non‑permanent adhesive spray to improve grip. For extra tactile identification, place one or two Bump Dots Combo Pack stickers adjacent to the Braille label; the high‑contrast colors assist low‑vision users in locating the medication quickly.
After the label is applied, wipe the surrounding area with an alcohol wipe to remove any residue that could affect adhesion. Allow the label to set for at least five minutes before handling the container to avoid accidental displacement.
Tips & Pro Tips
- Use a ruler or the built‑in measurement marks on the labeler to maintain consistent label length across all medications.
- When embossing dosage information, include the unit of measure (e.g., mg, ml) to prevent dosage confusion.
- Store the Braille labeler and spare tape rolls in a dry, temperature‑controlled environment to preserve the mechanical components.
- Apply a single Bump Dot of a contrasting color to the top of each label; this visual cue assists caregivers who are sighted.
- For households with multiple users, create a master inventory sheet that lists the Braille content of each label; keep the sheet in a secure, accessible location.
Troubleshooting
Problem: The vinyl tape does not feed smoothly and becomes jammed.
Solution: Remove the tape roll, ensure that the tape is seated correctly in the guide, and gently pull the free end to confirm that it lies flat. If the tape is curled, use a pair of scissors to trim the leading edge before re‑inserting.
Problem: The embossed Braille dots feel shallow and are difficult to read.
Solution: Verify that the trigger is being squeezed completely; incomplete compression reduces dot height. Adjust hand pressure and repeat the embossing for the affected characters.
Problem: Labels peel off after a few days.
Solution: Clean the container surface with an alcohol wipe before application, and consider using the clear Braille Labeling Tape which provides a stronger adhesive bond than some low‑cost alternatives.
Conclusion
This guide has presented a reliable method for labeling medication with tactile Braille and raised markers. By following the organized steps, users can create durable, easy‑to‑read labels that enhance safety and independence. The recommended tools—Handheld Braille Labeler, Reizen Braille Labeler, Braille Labeling Tape, Bump Dots Combo Pack, and Braille Container Labels—offer specific advantages that streamline the labeling workflow. Consistent use of these practices reduces the risk of medication errors and empowers individuals with low vision to manage their health confidently.
Products Mentioned in This Guide
Frequently Asked Questions
What basic tools are required to create tactile medication labels for low vision users?
You need a handheld Braille labeler (or Reizen Braille labeler), Braille labeling tape, and optionally tactile markers or raised stickers.
How do you apply Braille labels to medication containers safely?
Clean the container, cut the Braille tape to fit, press the label firmly, and add tactile markers for extra identification.
What is the difference between a handheld Braille labeler and the Reizen Braille labeler?
The handheld labeler is manual and lightweight, while the Reizen model is compact, ergonomic, and includes a self‑adhesive tape roll.
How can you maintain Braille labels so they stay readable over time?
Replace worn labels regularly, store containers away from moisture, and re‑apply fresh tape if the embossing fades.
Why are tactile medication labels important for people with low vision?
They reduce medication misidentification, lower the risk of adverse health events, and promote independence.