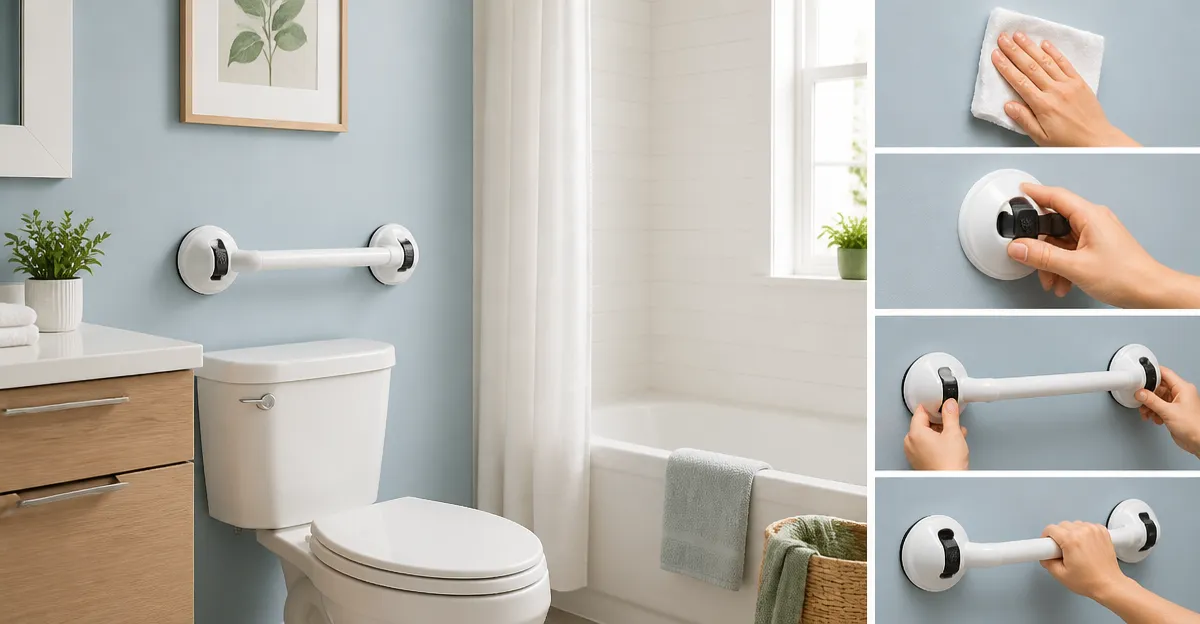
How to Mount Universal Grab Bars in Rental Bathrooms: Secure, Damage‑Free Solutions for Renters
Renters often require additional safety features in bathrooms without compromising the condition of the property. This guide explains how one can install universal grab bars using removable, suction‑based solutions that leave no permanent marks. The reader will learn the necessary tools, the step‑by‑step process, and best‑practice advice to achieve a secure installation. By following these instructions, one can enhance bathroom safety for seniors, individuals with limited mobility, or anyone seeking extra support.
What You Will Need
- Two‑Pack suction grab bars (choose a size that matches the bathroom layout).
- Clean, dry surface cleaning supplies (isopropyl alcohol, lint‑free cloth).
- Measuring tape and a pencil for marking placement.
- Level to ensure horizontal alignment.
- Optional: Silicone sealant for extra grip in humid environments.
The following products from Amazon provide reliable suction‑based mounting without drilling:
- TAILI Suction Shower Grab Bars (2‑Pack, 16.8")
- LEVERLOC Suction Shower Grab Bar (2‑Pack, 12")
- TAILI Suction Shower Grab Bars (2‑Pack, 12.2")
Step 1: Assess the Bathroom Layout
Begin by identifying the locations where support is most needed, such as beside the bathtub, near the toilet, or along the shower wall. Measure the distance between the intended anchor points to ensure that the chosen grab bar length will fit comfortably. One should also verify that the surface is smooth, non‑porous, and free of grout lines, as suction cups adhere best to tile, glass, or acrylic. This assessment prevents the need for later adjustments and guarantees optimal grip.
Step 2: Choose the Appropriate Grab Bar Size
For larger spaces, the TAILI Suction Shower Grab Bars (2‑Pack, 16.8") provide extended reach, while the TAILI Suction Shower Grab Bars (2‑Pack, 12.2") are ideal for tighter corners. The LEVERLOC Suction Shower Grab Bar (2‑Pack, 12") offers a compact profile suitable for shower stalls with limited clearance. Selecting the correct length reduces the likelihood of over‑extension and improves user comfort.
Step 3: Prepare the Installation Surface
Thoroughly clean the intended mounting area with isopropyl alcohol to remove soap residue, mineral deposits, and any oily film. Use a lint‑free cloth to dry the surface completely; moisture interferes with suction performance. For particularly glossy tiles, a light abrasion with fine‑grade sandpaper can increase surface texture without causing damage. Allow the surface to air‑dry for several minutes before proceeding.
Step 4: Position the Grab Bar and Mark Placement
Place the grab bar against the wall at the desired height, typically between 33 and 36 inches from the floor for most adults. Use a level to confirm that the bar is perfectly horizontal, as an uneven bar reduces grip strength and may cause the suction cups to slip. Mark the top and bottom edges of the bar with a pencil to guide final placement. This step ensures consistent alignment across multiple bars if more than one is installed.
Step 5: Install the Suction Cups
Press each suction cup firmly against the marked area, ensuring that the cup is centered over the cleaned surface. Engage the locking lever or twist mechanism supplied with the bar to create a vacuum seal. For the TAILI Suction Shower Grab Bars, the heavy‑duty silicone base provides a strong hold even on slightly textured tiles. The LEVERLOC model includes a reinforced suction cup designed for high‑humidity environments, reducing the risk of seal loss over time.
Step 6: Test the Installation
After all cups are secured, gently apply weight to the bar to confirm stability. One should feel no movement or wobble; if any shifting occurs, release the suction, clean the surface again, and reinstall. For added confidence, perform a pull‑test by applying a force equivalent to the user’s body weight. This verification step is critical to ensure safety before regular use.
Step 7: Optional Reinforcement with Silicone Sealant
If the bathroom experiences frequent steam, applying a thin bead of silicone sealant around the suction cup edge can improve adhesion. Use a waterproof, mold‑resistant silicone that can be removed without residue. Allow the sealant to cure for at least 24 hours before applying full weight. This optional measure extends the lifespan of the grab bar in high‑moisture settings.
Step 8: Maintain the Grab Bars
Periodically inspect the suction cups for mineral buildup, especially in hard‑water areas. Clean the cups with a mixture of vinegar and water to dissolve deposits, then rinse and dry thoroughly. Re‑engage the suction mechanism after each cleaning to maintain optimal grip. Regular maintenance prevents accidental disengagement and preserves the damage‑free nature of the installation.
Tips & Pro Tips
- Install grab bars at a height that allows a natural arm bend of approximately 90 degrees when standing.
- When mounting near the tub edge, ensure the bar does not interfere with the faucet or showerhead operation.
- For renters with pets, choose a bar with a smooth finish to avoid scratches on the floor.
- Use a small piece of double‑sided tape beneath the suction cup for an extra initial hold; it can be removed later without damage.
- Consider placing a non‑slip mat in front of the bar to provide additional footing stability.
Troubleshooting
| Problem | Possible Cause | Solution |
|---|---|---|
| Bar slides after installation | Surface not completely dry or contains residue | Re‑clean the area with isopropyl alcohol, dry thoroughly, and reinstall. |
| Seal loses suction over time | High humidity causing condensation | Apply silicone sealant around the cup or relocate to a less humid spot. |
| Visible marks on tile after removal | Improper removal technique | Release suction slowly, use a plastic scraper to lift the cup gently, then clean with mild detergent. |
Conclusion
Renters can achieve a secure, damage‑free grab bar installation by following the outlined steps and using high‑quality suction‑based products. The process emphasizes surface preparation, proper sizing, and thorough testing to ensure long‑lasting safety. By adhering to these guidelines, one enhances bathroom accessibility while preserving the landlord’s property. The guide empowers renters to make independent safety improvements without the need for permanent fixtures.
Products Mentioned in This Guide
Frequently Asked Questions
Can I install grab bars in a rental bathroom without drilling?
Yes, suction‑based universal grab bars attach securely to clean, dry surfaces without any permanent holes.
What surface preparation is required for suction grab bars?
Clean the area with isopropyl alcohol and a lint‑free cloth to remove soap residue and moisture.
How do I ensure the grab bars are level and properly positioned?
Use a measuring tape, pencil marks, and a level to align the bars horizontally before attaching them.
Will humidity affect the grip of suction grab bars?
In very humid bathrooms, applying a thin layer of silicone sealant can improve suction and prevent slipping.
Are suction grab bars safe for seniors and people with limited mobility?
When installed on a smooth, non‑porous surface and tested for hold, they provide reliable support for everyday use.