How to Replace a Kitchen Faucet Lever for Seniors: Easy‑Grip, Step‑by‑Step Guide
Older adults often encounter worn or loose faucet levers that reduce confidence in daily kitchen tasks. This guide explains precisely what the reader will learn, why the knowledge is valuable, and how to accomplish the replacement with minimal strain. By following the instructions, seniors can restore reliable water control, avoid costly professional calls, and maintain an independent household. The article also integrates carefully selected Amazon products that simplify each stage of the process.
What You’ll Need
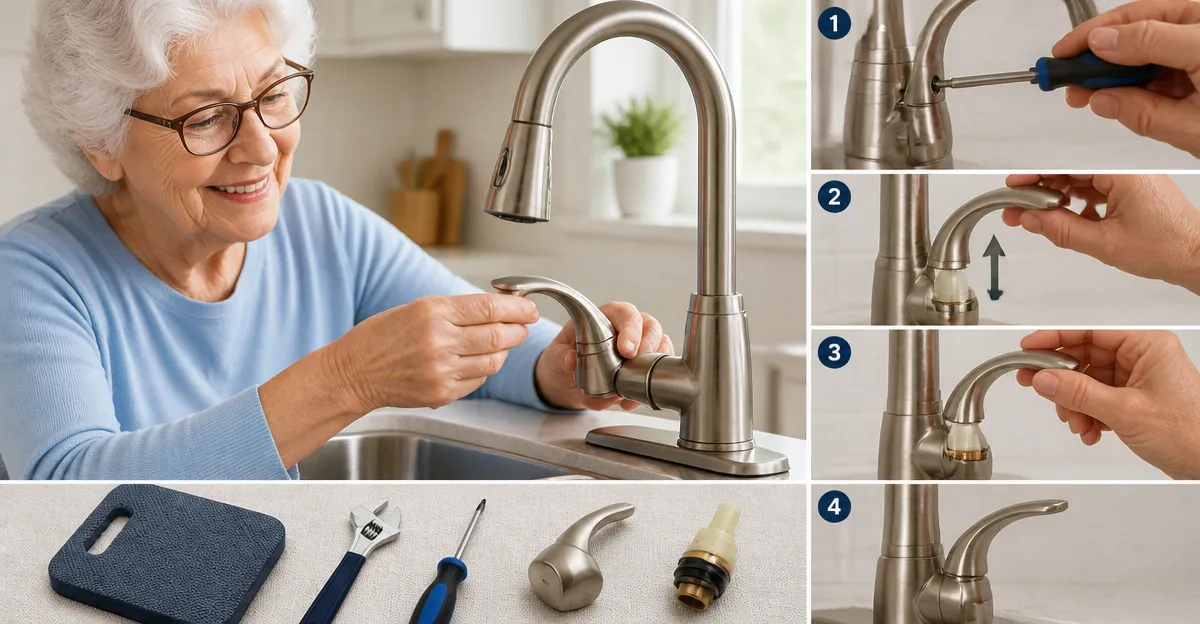
- Adjustable wrench or the included wrench from the replacement kit
- Phillips or flat‑head screwdriver (depending on the set‑screw type)
- Plumber’s grease or silicone lubricant
- Cleaning cloths and a small bucket
- One of the recommended faucet lever handles (first mention linked below)
Step 1: Prepare the Workspace and Ensure Safety
Begin by clearing the area beneath the sink so that tools and replacement parts are easily reachable. Place a bucket to catch any residual water that may escape during disassembly. It is advisable to wear non‑slip gloves to improve grip and protect the skin from sharp edges. Senior readers should verify that the lighting is adequate, as proper illumination reduces the risk of mistakes.
Step 2: Shut Off the Water Supply
Locate the shut‑off valves beneath the sink; they are typically marked with red (hot) and blue (cold) handles. Turn each valve clockwise until it stops moving to prevent water flow during the replacement. Open the faucet briefly to release any pressure that remains in the lines. If the valves are corroded, a gentle tap with a rubber mallet can free them without causing damage.
Step 3: Remove the Existing Lever
Identify the set screw that secures the current lever to the faucet cartridge. The screw is often concealed beneath a decorative cap; use a flat‑head screwdriver to pry the cap away carefully. Once exposed, loosen the set screw with the appropriate screwdriver or the wrench that accompanies the new kit. Gently lift the old lever away from the cartridge; if it resists, wiggle it slightly rather than applying excessive force.
Step 4: Choose the Correct Replacement Lever
Measure the cartridge stem to confirm whether it is a 35 mm or 40 mm model. Most modern kitchen faucets use a 35 mm cartridge with a 9 × 9 mm square stem. For a 35 mm cartridge, the uxcell 35mm Faucet Handle provides a stainless‑steel finish, a built‑in wrench, and colour‑coded hot/cold markers. It is priced at $9.49 and holds a rating of 4.3 out of 5 from 40 reviews, indicating reliable performance for budget‑conscious users. If the faucet is a Delta model, the Delta Waterfall Lever Handle Kit offers a chrome finish, ambidextrous design, and a push‑button lock mechanism; it costs $19.99 and enjoys a rating of 4.4 out of 5 from 362 reviews. For a 40 mm cartridge, the uxcell 40mm Faucet Lever Handle is appropriate, featuring a zinc‑alloy construction and a smooth turning action, priced at $9.99 with a 4.4 rating from 39 reviews. Each product includes a red/blue badge for temperature identification, which aids seniors in distinguishing hot from cold water without confusion.
Step 5: Install the New Lever
Place the new lever onto the cartridge stem, aligning the set‑screw hole with the stem aperture. Insert the set screw provided in the kit and tighten it using the included wrench or a screwdriver; the uxcell handles include a dedicated wrench, while the Delta kit relies on a push‑button lock that secures the lever without additional tools. Apply a thin layer of plumber’s grease to the screw threads to prevent future loosening, especially important for users with limited hand strength. Verify that the red and blue markers are oriented correctly—red for hot water and blue for cold—so that temperature adjustments are intuitive.
Step 6: Reconnect Water Supply and Test Operation
Turn the shut‑off valves counter‑clockwise to restore water flow. Slowly open the faucet and observe the lever for any leaks around the set screw. Adjust the lever position to ensure smooth rotation and that the water temperature changes as expected when moving between the red and blue zones. If a minor drip persists, tighten the set screw an additional quarter turn and re‑apply grease if necessary.
Tips & Pro Tips
- Mark the location of the set screw with a small piece of tape before removal; this prevents misalignment during reassembly.
- Use a flashlight with a flexible neck to illuminate the cartridge area without straining the neck.
- If the faucet handle feels loose after installation, add a thin washer between the lever and cartridge to increase friction.
- For seniors with arthritis, consider a lever with a larger grip diameter, such as the YMHOME 35mm Faucet Handle, which offers a heavy‑duty zinc alloy body and an ergonomic shape.
Troubleshooting
Problem: Lever continues to wobble after tightening.
Solution: Ensure the cartridge stem is clean and free of debris; re‑apply the set screw with a slightly longer wrench to achieve proper torque.
Problem: Water does not stop flowing when the lever is turned to the off position.
Solution: Verify that the cartridge is seated correctly; an improperly aligned cartridge can cause continuous flow, requiring removal and repositioning.
Conclusion
By following the six detailed steps, seniors can replace a kitchen faucet lever confidently, restore precise water control, and avoid unnecessary service calls. The guide emphasizes safety, proper measurement, and the selection of suitable replacement handles, ensuring that the task is both affordable and manageable. Readers are encouraged to apply the tips and troubleshooting advice to maintain a leak‑free faucet for years to come.
Products Mentioned in This Guide
Frequently Asked Questions
What tools are needed to replace a kitchen faucet lever?
You’ll need an adjustable wrench (or the kit wrench), a Phillips or flat‑head screwdriver, plumber’s grease, cleaning cloths, and a bucket.
How can seniors work safely under the sink?
Clear the area, place a bucket to catch water, use a stable stool, and keep tools within easy reach to avoid over‑reaching.
How long does a faucet lever replacement usually take?
Most seniors can complete the job in 30‑45 minutes when following the step‑by‑step guide.
Should I turn off the water supply before starting?
Yes, shut off the shut‑off valves under the sink to prevent leaks and water damage.
Do I need a specific lever handle for easy grip?
Choose a lever handle marketed as “easy‑grip” or “senior‑friendly” for better comfort and control.