Introduction
Installing a touchless faucet transforms a traditional bathroom into a safer, more accessible space for seniors. This guide explains the entire retrofit process, from gathering tools to final testing, while recommending two high‑quality Amazon products that simplify each stage. Readers will learn why hands‑free operation reduces slip risks, how countertop temperature controls eliminate the need to bend, and which components ensure a durable, leak‑free installation. By following the step‑by‑step instructions, one can complete the upgrade without professional assistance, saving time and money while enhancing independence for aging occupants.
What You’ll Need
- Adjustable wrench or basin wrench
- Phillips and flathead screwdrivers
- Plumber’s tape (PTFE tape)
- Bucket and towels for water runoff
- Electrical drill with appropriate bits (optional for deck plate)
- Battery pack (AA) for sensor‑powered models
- Derpras Touchless Faucet – ideal for residential retrofits
- HHOOMMEE Commercial Touchless Faucet – suited for high‑traffic or premium installations
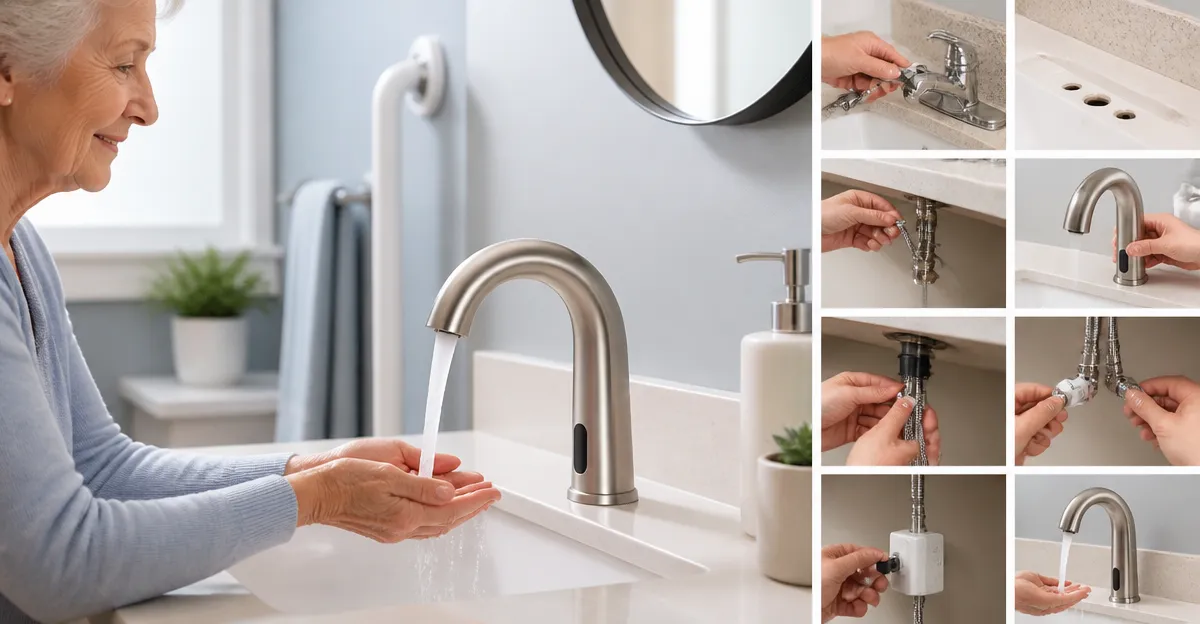
Step 1: Shut Off the Water Supply
The first safety measure is to locate the shut‑off valves beneath the sink and turn them clockwise until they stop. If the valves are corroded, use a wrench to avoid damage. Open the faucet briefly to relieve residual pressure and confirm that water flow has ceased. This step prevents accidental flooding and protects both the existing plumbing and the new touchless unit during removal.
Step 2: Disconnect the Existing Faucet
Place a bucket beneath the supply lines to catch any remaining water. Use the adjustable wrench to loosen the nut connections on both hot and cold lines, then detach the supply hoses. Remove the mounting nuts that secure the old faucet to the countertop, taking care not to damage the sink surface. If the previous faucet used a deck plate, unscrew it and clean the area thoroughly before proceeding.
Step 3: Prepare the Countertop and Deck Plate
Inspect the countertop for any cracks or unevenness that could affect the new faucet’s seal. Lightly sand the mounting surface if necessary, then wipe it clean with a lint‑free cloth. For models with a detachable deck plate, such as the Derpras Touchless Faucet, align the plate with the pre‑drilled holes and ensure it sits flush. The chrome‑finished, scratch‑resistant deck plate provides a smooth, hygienic surface that resists daily wear.
Step 4: Install the New Faucet Base
Position the faucet base over the mounting holes, ensuring the countertop thickness does not exceed the manufacturer’s maximum (1.86 inches for the Derpras model). Insert the supplied mounting hardware through the holes and secure it with the provided nuts, tightening them by hand and then with a wrench for a snug fit. This step creates a stable anchor that will support the sensor and temperature adjustment mechanisms during daily use.
Step 5: Connect Water Supply Lines
Wrap PTFE tape clockwise around the threads of the hot and cold supply lines to create a watertight seal. Attach the dedicated 1/2" water hoses that accompany the Derpras faucet, or use the included 9/16" gold adapters for the HHOOMMEE model. Tighten each connection with the wrench, being careful not to overtighten, which could strip the threads. Proper sealing at this stage eliminates drips and ensures the sensor receives consistent water pressure.
>Step 6: Install the Sensor and Power Source
Both faucets operate via infrared sensors that detect hand proximity. For battery‑operated units, insert four AA alkaline batteries into the compartment located beneath the deck plate. The HHOOMMEE faucet specifies a two‑year battery life under typical household use. If the model includes a hard‑wired option, follow the manufacturer’s wiring diagram and connect to a GFCI‑protected outlet to meet electrical safety codes.
Step 7: Adjust Temperature Settings
The countertop temperature adjustment knob on the Derpras faucet allows users to set a comfortable water temperature without bending down, which is especially beneficial for seniors with limited mobility. Turn the knob clockwise to increase temperature and counter‑clockwise to decrease it, testing the water with a thermometer to confirm the desired range. The HHOOMMEE model features a thermostatic valve under the sink, offering precise temperature control for commercial environments.
Step 8: Test for Leaks and Sensor Functionality
Turn the main water supply back on slowly, watching each connection for signs of leakage. Activate the sensor by placing your hands beneath the spout; water should flow instantly and stop when hands are removed. Verify that the temperature knob responds accurately and that the water pressure remains steady. If any leaks appear, tighten the affected connections and re‑apply PTFE tape as needed.
Step 9: Final Finishing Touches
Secure any loose cables or battery compartments to prevent accidental exposure. Clean the chrome surfaces with a non‑abrasive cleaner to maintain the faucet’s shine. For added safety, consider installing a non‑slip mat near the sink and labeling the sensor area with a simple graphic indicating “hands‑free water.” These finishing details enhance the overall user experience for seniors.
Tips & Pro Tips
- When working in a tight bathroom, use a basin wrench to reach hard‑to‑access nuts without stripping them.
- Replace old supply lines with flexible braided hoses to improve durability and reduce vibration.
- For households with multiple users, set the temperature knob to a median value to accommodate varied preferences.
- Periodically test battery life; replace AA cells before they become weak to avoid sensor failures.
- Consider adding a low‑flow aerator (2 GPM) to conserve water while maintaining a comfortable flow, as featured on the HHOOMMEE faucet.
Troubleshooting
No Water Flow: Verify that the sensor is powered and that batteries are correctly installed. Check that the infrared sensor is not obstructed by debris or a misaligned deck plate.
Dripping After Shut‑off: Ensure the ceramic cartridge is seated properly; a misaligned cartridge can cause a slow leak. Tighten the mounting nuts and re‑apply PTFE tape if necessary.
Temperature Not Adjusting: Confirm that the knob is not stuck due to mineral buildup. Clean the knob with a mild vinegar solution and test again.
Conclusion
By following this comprehensive guide, one can successfully retrofit an existing bathroom with a touchless faucet that enhances safety, conserves water, and provides ergonomic comfort for seniors. The recommended Derpras and HHOOMMEE models offer reliable sensor technology, easy temperature control, and robust construction, making them suitable choices for both residential and commercial settings. Implementing these upgrades not only improves daily living but also adds value to the home.
Products Mentioned in This Guide
Frequently Asked Questions
What are the main safety benefits of installing a touchless faucet for seniors?
Hands‑free operation reduces slip hazards and eliminates the need to twist knobs, while temperature controls prevent burns from hot water.
Which tools are essential for a DIY touchless faucet retrofit?
An adjustable or basin wrench, Phillips and flathead screwdrivers, PTFE plumber’s tape, a bucket, towels, and optionally an electric drill for the deck plate.
Can a touchless faucet be installed on existing plumbing without major modifications?
Yes, most models, like the Derpras Touchless Faucet, are designed to replace standard faucet assemblies and use the same supply lines.
How often do the battery‑powered sensors need new batteries?
Battery life varies, but AA batteries typically last 12‑18 months and should be replaced when the sensor indicator flashes or the faucet slows.
What steps help ensure a leak‑free installation?
Wrap all threaded connections with PTFE tape, tighten fittings securely with a wrench, and test for drips before final mounting.