Introduction
This guide will teach readers how to convert standard forks, spoons, and knives into comfortable, arthritis‑friendly eating tools. One will discover why a secure, padded grip can reduce hand fatigue and improve independence during meals. The instructions are designed for seniors, caregivers, and occupational therapists who need practical solutions without expensive equipment. By the end of the article, one will be able to create durable, customized grips that enhance daily living.
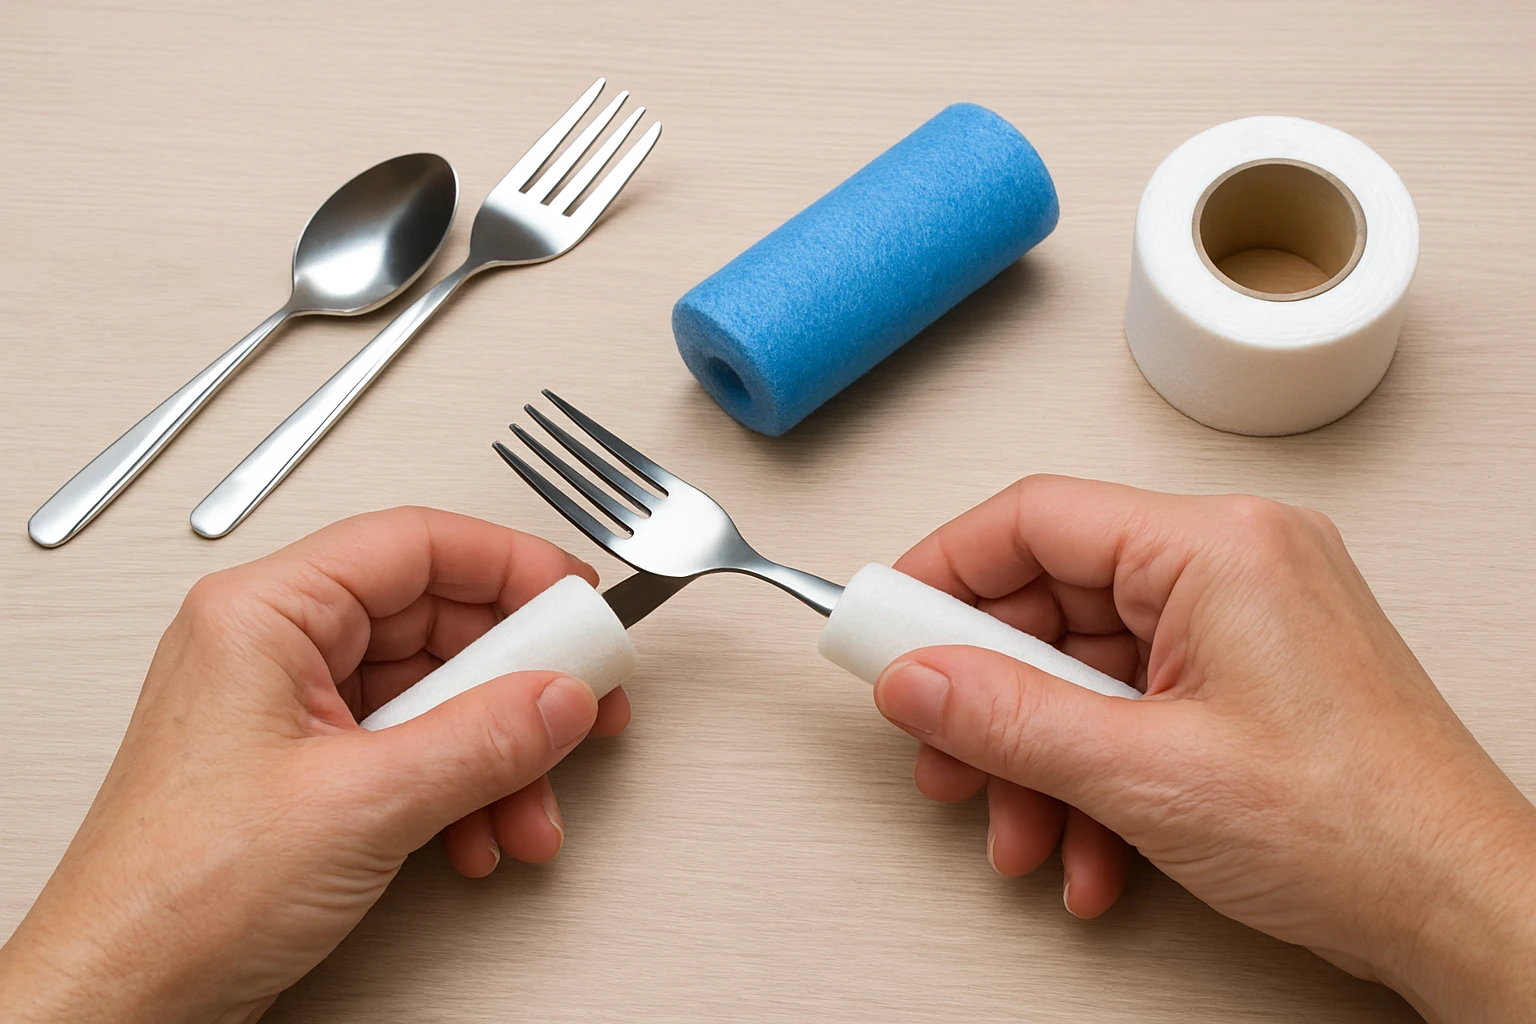
What You’ll Need
- Standard metal or plastic utensils that require a larger handle.
- Fampery Foam Grip Tubing – 8‑pack, assorted sizes, $6.99, 4.2/5 rating.
- EazyHold Universal Cuff – 5‑pack silicone cuffs, $39.99, 4.5/5 rating.
- Sharp kitchen scissors or a small utility knife.
- Mild dish soap, warm water, and a clean towel.
- Optional: a marker for labeling different grip lengths.
Step 1: Choose the Right Utensils
The first step is to select utensils that are structurally sound and have a smooth shaft. One should avoid heavily serrated or damaged handles because they may cut the foam tubing. Stainless‑steel forks and spoons with a uniform diameter work best, as they allow the tubing to slide on evenly. If the utensil already has a plastic coating, verify that it is not brittle; otherwise, the grip may detach during use.
Step 2: Measure and Cut Foam Grip Tubing
Fampery Foam Grip Tubing comes in four inner diameters (0.75 cm, 0.95 cm, 1.2 cm, 1.5 cm) and a length of 3.54 inches per piece. Measure the handle of each utensil and choose the tube that fits snugly without excessive compression. Using kitchen scissors, cut the tube to a length that covers the portion of the handle where the hand applies the most pressure—typically the lower two‑thirds of the shaft. Cutting to the correct length prevents excess material from slipping off during meals.
Why this product is useful: the foam material is soft, water‑resistant, and adheres without adhesives, providing immediate comfort. Its no‑cut design means one can slide the tube onto the utensil without tools, saving time and reducing the need for additional hardware. The assorted colors also help users differentiate between forks, spoons, and knives, which can be beneficial for individuals with cognitive challenges.
Step 3: Install the Foam Tubes
Slide the cut piece of tubing onto the utensil from the tip toward the handle until it reaches the desired position. If the fit feels loose, gently compress the tube while sliding to create a tighter seal. For a more secure fit on larger handles, one may double‑wrap the tube by overlapping two pieces, ensuring the combined thickness matches the handle diameter. Once in place, wipe the exterior with a damp cloth to remove any debris that could cause slippage.
After installation, allow the foam to air‑dry for a few minutes. The material regains its original shape after being compressed, which helps maintain a consistent grip during repeated use. This step does not require any adhesives, preserving the utensil’s original finish and making cleaning straightforward.
Step 4: Apply the Universal Cuff for Extra Stability
The EazyHold Universal Cuff provides an additional layer of security by encircling the utensil’s shaft and the foam grip. Select a cuff size that matches the combined diameter of the utensil and foam tube; the product includes five sizes ranging from infant to adult. Stretch the silicone cuff over the foam‑covered portion, ensuring it sits slightly above the top of the tube. The soft, stretchy silicone warms to skin temperature, offering a comfortable fit without excessive pressure.
Why this product is useful: the cuff prevents the foam tube from rotating or sliding off, especially when the user applies lateral forces while cutting or scooping. Its silicone composition is dishwasher‑safe and can be sterilized in an autoclave, making it ideal for care facilities. Moreover, the cuff’s extra‑sensory surface enhances proprioceptive feedback, helping users gauge how much force they are applying.
Step 5: Test the Modified Utensil
Before a full meal, conduct a brief test by holding the utensil with a light grip and performing typical motions such as stabbing, scooping, and twisting. Observe whether the foam remains centered and whether the cuff stays in place. If any slippage occurs, adjust the tubing length or select a larger cuff size. Encourage the user to practice with a dry food item (e.g., rice or crackers) to build confidence.
During the test, pay attention to any pressure points on the hand. If the user reports discomfort, consider adding a second layer of foam or selecting a softer cuff size. The goal is to achieve a balance between firmness (to prevent movement) and cushioning (to reduce strain).
Tips & Pro Tips
- Label each modified utensil with a colored marker that matches the foam tube color; this aids visual identification for users with memory impairments.
- For individuals who prefer a thicker grip, stack two foam tubes of different diameters before applying the cuff.
- When cleaning, hand‑wash the utensils with mild soap; the foam and silicone are both resistant to dish‑washer heat but prolonged exposure may reduce elasticity over years.
- Store the modified utensils in a dry container to prevent moisture buildup, which could cause the foam to become overly soft.
- If a user experiences skin irritation, ensure the silicone cuff is fully rinsed and dried before each use.
Troubleshooting
| Problem | Possible Cause | Solution |
|---|---|---|
| Foam tube slides off during use | Incorrect inner diameter or insufficient compression | Choose a smaller‑diameter tube or double‑wrap the tube; re‑apply the universal cuff for added friction. |
| Cuff feels too tight | Oversized cuff selected | Replace with the next smaller silicone size; silicone stretches but should not pinch the skin. |
| Utensil feels unstable | Foam not centered or cuff misaligned | Re‑position the foam so it is centered on the handle; ensure the cuff sits just above the tube. |
| Material becomes sticky after washing | Residue from dish soap | Rinse thoroughly with warm water and allow to air‑dry; avoid harsh detergents. |
Conclusion
One has now learned how to transform ordinary utensils into ergonomic, arthritis‑friendly tools using affordable, readily available materials. By applying Fampery Foam Grip Tubing and securing it with an EazyHold Universal Cuff, seniors can enjoy meals with reduced hand strain and increased confidence. The process is repeatable, customizable, and can be adapted for a wide range of daily activities beyond eating, such as writing or grooming. Implementing these modifications empowers individuals to maintain independence and enhances quality of life.
Products Mentioned in This Guide
Frequently Asked Questions
How can I turn a regular fork into an arthritis‑friendly utensil?
Cut a length of foam grip tubing, slide it over the fork handle, and secure it with a silicone cuff for a padded, non‑slip grip.
What materials are needed for DIY easy‑grip modifications?
Standard metal or plastic utensils, foam grip tubing, silicone cuffs, scissors or a utility knife, mild soap, warm water, and a towel.
Are the foam grip tubes and silicone cuffs safe for food contact?
Yes, both are food‑grade silicone and foam designed for kitchen use and can be washed with warm, soapy water.
How long does it take to modify a set of utensils?
Each utensil takes about 2–3 minutes to cut, fit, and secure the grip, so a full set can be done in under 15 minutes.
Can I customize grip length for different users?
Absolutely—use a marker to label different tubing lengths and trim each piece to the hand size that feels most comfortable.